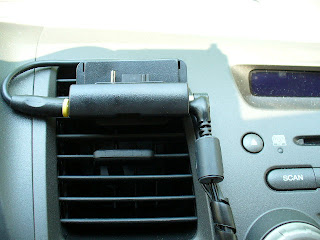
A few months ago I began driving an ’08 Civic EX and wanted to install my existing XM Satellite radio receiver. I have a Delphi Roadie XT receiver that comes standard with a cassette adapter. However, Honda now includes a CD player as standard equipment and the old cassette player is no longer available. Fortunately Honda also includes an MP3 jack on all Civics (except the entry level DX). Having the MP3 jack makes installation of XM Radio a breeze.
Before I get too far, I’ll mention that XM also includes an FM modulator on most of their current radio receivers. For this to work you stick a small adhesive-backed contact over the radio antennae inside the rear window. You then select an FM channel in your XM receiver and link the wire from the adhesive contact to the antennae wire. To listen to XM you tune your radio to the frequency programmed into the XM receiver. If you drive a vehicle without an MP3 jack or a cassette player this is one of your only options for listening to XM. Unfortunately the sound quality is pretty bad and I’m sure anyone using this connection method would be disappointed. Another problem with this method aside from the poor sound quality is that you need to re-program the frequency in your XM receiver if you ever travel into an area that broadcasts an FM signal on the frequency that was originally programmed into the receiver.
Since Honda includes the MP3 jack on the Civic (except for the DX) the FM modulator problem is a non-issue. As mentioned above, installation is really easy with the MP3 jack and it took me approximately 30 minutes to be up and running. The only additional accessory I needed to buy was the MP3 cable which I picked up from Best Buy for about $20.00. Since the power outlet and the MP3 outlet are right next to each other below the dashboard, the installation looks pretty clean. XM includes a spiral looking tube to join together the wires and cables and this really improves the look of the installation.

Here are the basic steps for installation:
1. Mount the receiver cradle (I mounted my unit to the air vent using 2 clips included with the receiver) and place the receiver into the cradle.
2. Connect the MP3 cable to the receiver and plug it into the jack.
3. Connect the power cable to the receiver and then plug it into the power outlet.
4. Connect the antennae wire to the receiver and then run wire to the outside of the car. Place the magnetic antennae “puck” on the roof of the car.
5. Tidy up the cables coming from the receiver and hide the antennae wire so it is not visible.
6. Turn on the radio and enjoy XM.
No tools are required. Nothing to cut, tape or rig together.
Most of the time spent on installation is with the antennae wire. The antennae wire runs from the receiver along the inside of the center console up toward the firewall. From there the wire runs straight back under the carpet into the back seat area. The wire then runs under the rear floor mats and up between the left rear seat and door into the trunk (Since the rear seats fold down to expand the trunk area there are seams on the edges of the seats. It is very easy to run the antennae wire through these seams and into the trunk). The wire then comes up from the trunk lid to the rear window and along the edge of the glass to the roof. There is a recess along the edge of the glass to easily and securely hide the wire and there is no rubber seal to fight with like on some other vehicles. The antennae wire is very thin and is easily hidden under the floor mats and under seams where the carpet meets plastic panels. There is only about 4 inches of wire visible on the roof to where the puck is located.
Something nice about the Roadie XT - the receiver can easily be removed from the cradle and placed somewhere safe when not in use:

The power and MP3 cables mount near each other to help make a pretty clean install:

The antennae wire is virtually hidden where it snakes up between the rear seat and rear door:

From the rear seat the antennae wire comes across the top of the trunk back to the rear window. It is up and out of the way so it does not catch on items being placed in the trunk:

You can only see the antennae wire coming from the trunk to the rear window when the trunk is open

Only 4" of wire are visible where the antennae puck is placed on the roof:

The unit sounds very good and I’ve been pleased with quality. I used a cassette adapter in a previous vehicle and feel the sound through the MP3 connection is comparable.
The total cost of the setup is less than $100.00 ($60.00 for the receiver and $20.00 for the cable). I’m not sure if Honda offers dealer-installed XM for the Civic. If they do I’m sure the cost would be several times what I have in mine. I have read complaints from people in the past about all the wires that are visible with an owner-installed XM unit. However, I think my install is pretty clean and the only visible wires inside the car are those coming off the receiver which are neatly organized with the spiral tube mentioned earlier.


